Showing posts with label lesson. Show all posts

Wednesday, February 4, 2015

Time-Management: Planning Out Your "Ideal Week" of Course Activities

Vicki Davis wrote this week about a time-management technique that involves planning out your “ideal week, plugging it into your calendar not as absolute commitments, but for easy reference, and using that reference to try to spend your time as best as you possibly can. 

I’ve operated this year on a system similar to Vicki’s, for class time as well as out-of-class time.

Let me start with a few disclaimers. Feel free to skip these if you’re basically just willing to cut me some slack:
  1. (The don’t tell Grant Wiggins on me disclaimer): I don’t pretend for a second that your ideal week should look like mine! In fact, my ideal week has changed since I completed the exercise below, and it needs to continue to change. This post is about a time-management trick, not curriculum- and lesson-planning. Teachers really ought to plan how we spend class-time on a unit-by-unit basis, not once a year! I’m a deep believer in (often practitioner of, always aspirant to) backward design.  
  2. (The rephrasing disclaimer #1 disclaimer): As Vicki suggests, the “ideal week” is not  an absolute. It mustn’t be! it’s a handy way of reminding myself to cover all my bases. 
  3. (The alternate universe disclaimer): At my school we’re on an eight-day rotating block schedule (A-day through H-day), and actual days of the week (Monday-Friday) bear no relevance to our class schedule. So I’ll demonstrate an ideal rotation, not an ideal week. It’s just about confusing to us as it likely will be to you!
  4. (The nerdy disclaimer): Hi, my name is Ted, and (especially for an English teacher) I’m addicted to spreadsheets. I use them for applications like this where they work but are pretty unnecessary. Forgive the nerdy madness that follows, and if the concept appeals to you, find a process to make it work for you.


STEP 1: Prioritizing time, and distinguishing class work from home work:

  1. I broke out the major work of our course into categories, far left.
  2. Then I asked, in an ideal week, what percent of our total minutes (class work and homework) would be spent on that category of work?
  3. Of that percentage, what percent would be spent in class, and what percent would be spent at home?
  4. Then using the available time in a single rotation, I translated those percentages into minutes of coursework and homework


STEP 2: Divvying out the minutes across an ideal rotation, considering:

  1. Lengths of class periods and intervals between them
  2. Spaced and interleaved practice (If you haven’t yet read Make it Stick, stop reading this and start reading that)
  3. Regularity of assessment


STEP 3: Creating those ideal days as templates on Planboard (where I do most of my lesson planning)


Then how do I use it?


When planning a lesson on Planboard, I start with the template for that rotation day:


Occasionally, I’ll use this template as a bare-bones outline for my class, filling in my precise plans for each component. More often than not, I’ll fill in something slightly or completely different.


The point is, the template prompts me to cover my bases. I’m an English teacher: I live for classroom discussion. Left to my own devices (as I was in the first couple years of my career), I would do little else. With this little hack, I’m doing a whole lot better by my curriculum and my students.  

Sunday, March 2, 2014

TED Talks on Transformative Educational Technology (a YouTube Playlist)

I've pulled together this playlist of TED Talks that I think best demonstrate the transformative potential of educational technology.

What would you add?


Sunday, February 23, 2014

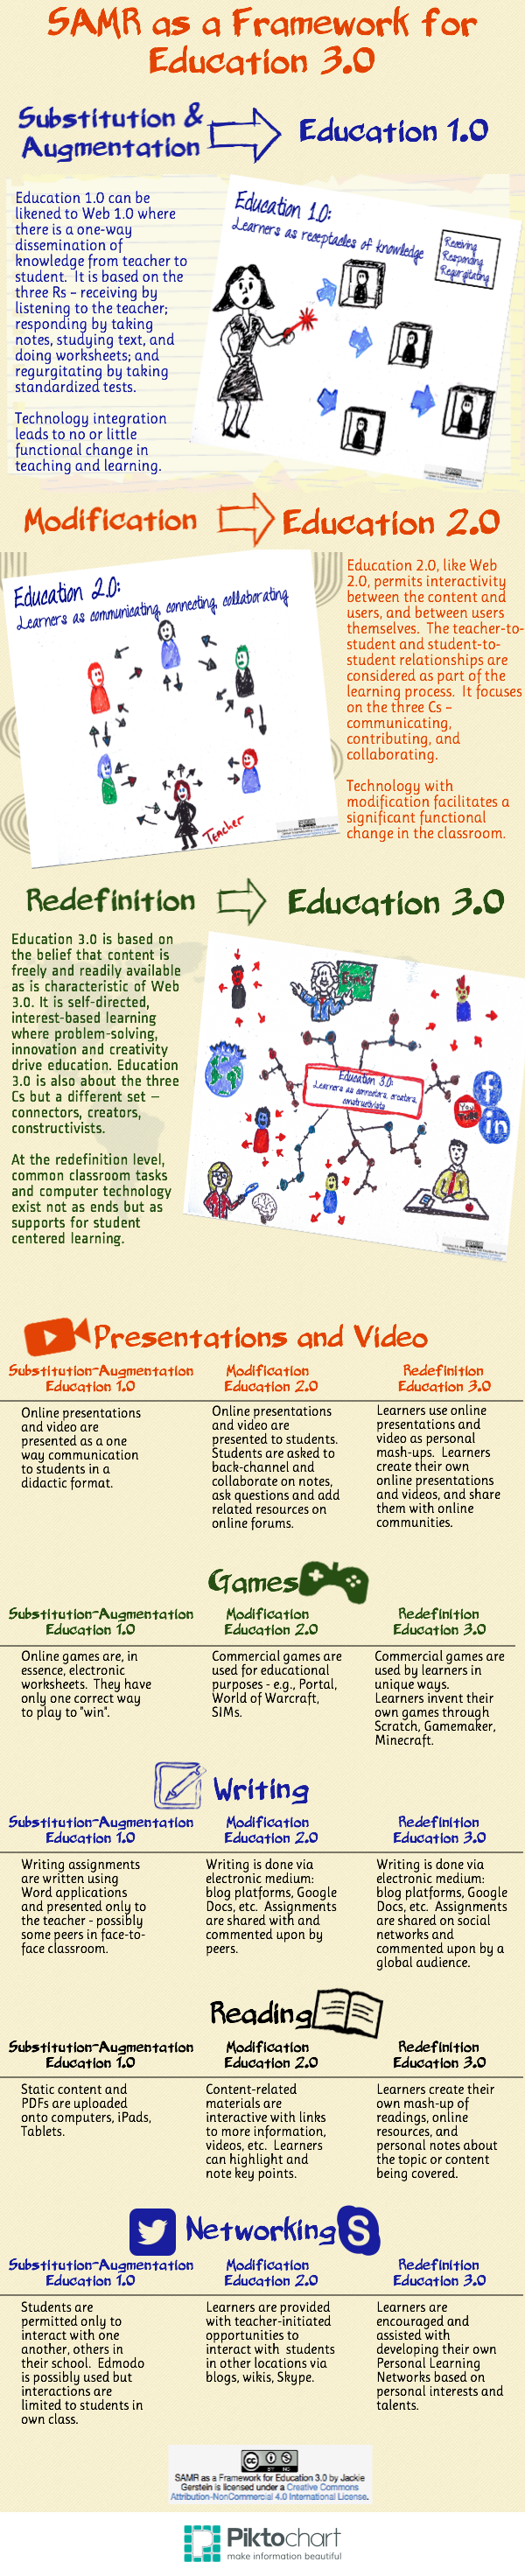
From Jackie Gerstein: "SAMR as a Framework for Education 3.0"

I only recently learned about the SAMR framework for Ed Tech integration, and it really has knocked my socks off. I love how it illustrates the continuum from using technology to achieve substantially the same tasks we've always done (substitution and augmentation) to using it truly to transform the ways we guide learning (modification and redefinition)--ideally to make it more student-centered.

I try normally to use this space for my own original contributions, but I occasionally make an exception to share something truly fabulous that I both want you to see and myself to remember. The below infographic surely fits that bill.

Do yourself and check out Jackie Gerstein's full post.


Sunday, December 15, 2013

Sunday, May 5, 2013

Personalization versus Differentiation versus Individualization (Chart)

Below is one of the best web resources I've found this year, from Barbara Bray and Kathleen McClaskey at Personalize Learning. We're always striving at my school to differentiate, and it's important to be able to make these kinds of distinctions.

Thursday, May 2, 2013

Use Microsoft Word to See Exactly What's Changed Between Drafts

INTERVIEWER: How much rewriting do you do?
HEMINGWAY: It depends. I rewrote the ending of Farewell to Arms, the last page of it, thirty-nine times before I was satisfied.
INTERVIEWER: Was there some technical problem there? What was it that had stumped you?
HEMINGWAY: Getting the words right.
 
(Ernest Hemingway, "The Art of Fiction," The Paris Review Interview, 1956)

I'm a firm believer that revision makes the writer. So as a writing teacher, I always require substantial revision (you can read here about how it manifests in my grading policy). But of course, reading several successive drafts of the same student essays can be downright impractical. 

Enter the "Compare Documents" feature in Microsoft Word. Stop trying to discern differences between drafts by holding them side-by-side. Let Word do it for you!

Using this feature allows me immediately to see what has changed from one draft to the next, and to flip  between the two versions. I can even see the digital comments I left on the original draft, and quickly assess whether revisions have addressed them. (Gone are the days of rereading an entire ten-page essay to determine the student only changed one sentence on page three...)

Check out the tutorial:


Tuesday, February 26, 2013

Collect digital submissions directly to Evernote

Evernote makes life easier. It's been central to my going (mostly) paperless and compiling student portfolios. Because my students don't yet all have Evernote--I'm deciding still if I'd like them to--I've had to devise a workaround to automatically collect their submissions into my notebooks.

I'd be interested to hear why the folks at Evernote haven't made this any easier. It could be they're worried about security, and/or that they're pushing a model whereby everyone has Evernote and just shares notebooks. (That's how it's done at Montclair Kimberly Academy)

My trick begins with the unique email address that Evernote grants every user, and their system for coding an email's subject line to file it in the correct notebook with your desired tags.

Since I don't know any code, I had to look long and hard for a web platform to create what I wanted: an embeddable form that could collect file submissions and send an email with the files attached, drawing on users' responses for the subject line and body text. JotForm was my favorite, but their free offering couldn't handle my number of submissions per month. (UPDATE: Looks like EmailMeForm and JotForm now have the same limit of 100 free submissions/month. Darn)

I eventually settled on EmailMeForm.


Let me walk you through the process:


I want to file submissions into notebooks by class section, and I want them all tagged "unread"


Here's what it looks like to build the form on EmailMeForm. For security, you can change the properties of the File Upload box(es) to only accept desired file types (e.g., .doc, .docx)


EmailMeForm allows you to craft the email notification with the form responses

Use "Dynamic Tokens" to populate the subject line with users' form responses (in this case, their name and their class section). Don't forget the @ before the desired notebook name, and # before the desired tag


EmailMeForm helps you out with the dynamic tokens


Here's what the resulting email looks like:


Here's the final form, embedded on my homework site:


And here's the resulting note in Evernote:


Saturday, February 16, 2013

Defining Custom Styles in Microsoft Word 2011 -- Makes Proofreading a Breeze!

Here's a trick for defining custom styles to highlight errors in student work. Giving each custom style a shortcut key makes proofreading a breeze!

Unable to display content. Adobe Flash is required.

You can activate full-screen viewing by hovering your mouse over the bottom right of the video, and clicking the button that appears.